Step-by-Step: Palladian Infantryman
As (regularly) promised, here's a simple step-by-step for painting up regular 2nd Battalion Guardsmen. There's nothing very complicated here; I don't think any of the steps will surprise even the newest players, but I've been asked a bit about the technique so here it is. I hope to do a few more of these and move on to more advanced ones as I get the hang of writing them (and remembering to photograph every stage ... )
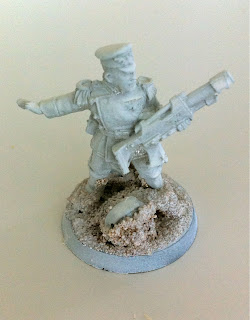 Step 1. The built model is cleaned and glued to a good old slottabase in the normal way. It's been based with fine sand, along with some bits from the 40K basing boxed set. These seem quite expensive but if you're economical with the bitz, one of these can comfortably cover 20-30 minis. It's undercoated with a Skull White spray; as you can see, fairly sloppily. It doesn't matter, almost none of the original white will show through by the end.
 Step 2. The tunic is painted Dark Angels Green. This includes pretty much all the fabric, except the trim and aguilette/eppaulettes. Again, sloppiness is acceptable here but if you are careful (as I've tried to be here) you can use the original white undercoat later on for some of the trim. If you make a mistake you can easily correct it with Skull White later, but minimising unnecessary layers is key to maintaining detail.
Stage 3. The boots, bayonet frog, belt and pouches are painted Scorched Brown.
 Stage 4. The lasgun, belt buckle and peak of the cap are painted Chaos Black. It's important in this stage to make sure all nooks and crannies are painted to cover up the white undercoat: focus on the area between the lasgun and body. I find sometimes that as I paint on each colour, the corners and crevices qualify as neither bits of tunic (so I don't paint them green), nor webbing (so I don't paint them brown) nor gun (so I don't paint them black). They end up being left white and it gives it a horrible unfinished look. After doing the gun, take a moment to find any white bits that are left and cover them up with black.
 Stage 5. The skin is painted a suitable colour. I like to mix and match between colours like Dwarf Flesh, Tallarn Flesh, Bronzed Flesh ... varying the skin tones, like the hair tones, gives each model a bit of individuality.
 Stage 6. The raised areas of the tunic are painted in Catachan Green. This is the key to my style of painting: an awful lot of the Dark Angels Green is left showing through on the creased bits, not just the edges and cracks. Almost like a fine highlight, rather than a new layer. This minimalist approach looks silly on individual models, but in an army of about 100 minis, you need to exaggerate the differences in highlighting and shadows otherwise it won't be noticeable. On individual and character models, you can be a bit more realistic and blend them together more naturally, as they will often be inspected close up.
 Stage 7. The white areas are given a liberal wash of any Black Ink. This is also extended to the gaps where the brown, green and black areas border each other to add shadow to things like belts, buttons etc, as well as covering up any tiny bits of white showing through.
 Stage 8. The trim is all given a fairly hefty and obvious coat of Skull White on the raised parts, for the same reasons given in Stage 6. (NB: this is about the point where I stopped remembering to take photos after every stages so the next few are blurred together a bit.)
 Stage 9. The raised bits of the tunic are given one final highlight of Knarlock Green. Also, I start on the flesh by washing it with a brown ink, then re-highlighting it with the original colour. (You can see skin isn't my strong point; hence Mordians not Catachans ... )
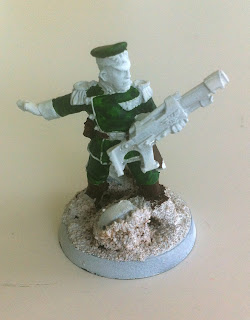
 Stage 10. A final highlight of Elf Flesh on the skin tones, as well as some Boltgun Metal dry brushed roughly on to the barrel, and very lightly onto the lasgun itself.
So there we are, as I promised nothing game-changing I hope, and also hopefully simple enough for a new painter to follow. It is also basic enough to be done continually on the same model, i.e. if you follow it step-by-step, you shouldn't need to leave much/any time between each step for drying, which helps enormously in speed painting. On a sergeant I might add some more sophisticated flesh work, and a very light Goblin Green highlight works well on some models, but this chap here is pretty much ready to take up position in the firing lines and defend the Immortal Emperor!
 Step 1. The built model is cleaned and glued to a good old slottabase in the normal way. It's been based with fine sand, along with some bits from the 40K basing boxed set. These seem quite expensive but if you're economical with the bitz, one of these can comfortably cover 20-30 minis. It's undercoated with a Skull White spray; as you can see, fairly sloppily. It doesn't matter, almost none of the original white will show through by the end.

Stage 3. The boots, bayonet frog, belt and pouches are painted Scorched Brown.


So there we are, as I promised nothing game-changing I hope, and also hopefully simple enough for a new painter to follow. It is also basic enough to be done continually on the same model, i.e. if you follow it step-by-step, you shouldn't need to leave much/any time between each step for drying, which helps enormously in speed painting. On a sergeant I might add some more sophisticated flesh work, and a very light Goblin Green highlight works well on some models, but this chap here is pretty much ready to take up position in the firing lines and defend the Immortal Emperor!


Comments
Post a Comment