 UPDATED with new pics, 11 May 2013
Time for more pictures, I think. Today, I'll show you a few of the Forgeworld artillery pieces I've done, along with a converted gun trailer.
The Palladian Guard make a lot of use of heavy artillery, with their lumbering, WWI-style tactics. Each position is methodically pounded with tonnes of ordnance prior to an assault, so the infantry advance upon a field of twisted metal and churned earth ... or at least that's the plan.
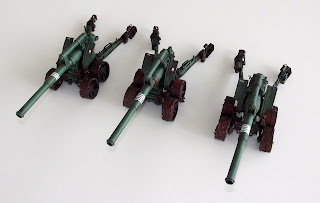
For my artillery models, the Heavy Support slot allows me three guns. After some careful weighing up of the options, I decided to go for Earthshakers. Although the Medusa's better stat line was tempting, the lure of 240" worth of range was too much. At those sorts of ranges, you can dominate the largest of battlefields with the enemy powerless to react. Another factor in my choice was of course the Forgeworld Earthshakers look really good on the trailers.

This is a good set of shots showing the
Earthshaker Cannon as a whole. The carriage is removable from the main gun, the gun traverses and the support legs at the back can be locked together with a pin to display it in 'limber' mode.
Obviously the biggest thing about these beasts is the cost ... especially if you want three in your army. There's nothing stopping you converting a gun carriage from scratch, and it seems fairly simple but it's very hard to make them look realistic. These Forgeworld pieces are really great quality and if you can afford them, they'll make an excellent centrepiece.
The guns are painted using the same colours as the infantry to tie them in; the same military olive drab that is the Palladian Guard's mainstay. The colours are the same: Dark Angels Green, Catachan Green, Knarlock Green and Goblin Green highlights. These are all added with a big tank brush, with
very very light drybrushes. Literally, when you rub the paintbrush across a piece of tissue paper it should leave no paint on at all. This is drybrushed on; with about 5-10 repeats, this very subtly builds up each colour. Catachan Green is painted on pretty much everywhere except recesses, Knarlock green onto large flat areas, and Goblin Green again on flat areas, but only 3-5 highlights. It's a time consuming process, and one which requires loads of patience but the end effect is great.
I haven't yet tried using the Citadel Spray Gun. I'm told you can get a similar effect to what I've just described but with much less effort, but I like the control and subtlety you can get with a brush. One day I'll dig out an old Chimera and try a Spray Gun.
 |
| Heavy Mortar (minus mud) |
The transfers are all from the Death Korps set, again
from Forgeworld and again very expensive. This one, however, pays for itself since you get an A4 sheet with hundreds of transfers, from individual shoulder pad numbers to artillery and tank markings too: probably enough to do a decent-sized army with.
Next up, the
Heavy Mortar. Accurate and cheaper in points than the bigger guns, these scrappy mortars are really valued for artillery 'sniping', that is precision targeting. Quote of the Day: A Strength 3 hit is better than a Strength 10 miss... Same paint job went in to this beast. Incidentally, the brightly coloured objects are the included ammunition canisters. They've been painted to represent gas shells, with a colour coding system that's a bit like the WWI method. Maybe there'll be some House Rules for gas to follow, who knows.
 |
| Toolboxes, fuel drums and tools for flavour |
With the Earthshaker in particular, the mud was done using household filler. This takes a bit of experimentation to get the right make, Quick-Dry Polyfila was the best I've found so far. Try it out on wheels and tracks, and you'll find real reference photos invaluable, as I say WWI is a great place to start for Imperial Guard with all the tanks and artillery. Remember when you do it not to worry if it looks awful, it stays workable for a while and a toothbrush will take it off if you need to try again. Be adventurous with the painting and modelling techniques, and you'll find out what works for you as well as probably coming up with one or two of your own to spread around.
 |
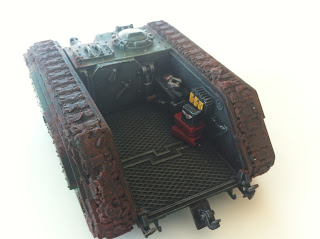
| Quick conversion of a Chimera to make a 'hauler' |
Next up, the gun trailer. This is really just a Chimera with the top and back left off, and I've added in some odds and ends from the bits box. It's been left empty on purpose as I'm planning to convert some engineering crew to be working on a broken engine in the back of it. It's a nice conversion because it looks 'natural', there's no huge structural changes involved and it almost looks like another tank out of a box - exactly what I was going for. The simple conversions are sometimes the best. Again, painting the same. The brown stripes are Dark Flesh then a normal drybrush of Graveyard Earth, highlighted very lightly with Bleached Bone. The mud is done with filler as above on the Earthshaker wheels, and the rear tow hook crucially fits the tow loops of both the Mortar and the Earthshaker. An 'in-motion' artillery train would make a great objective for a game, and I always try not to 'glue down' (literally and figuratively) the models, allowing them to be moved and weapons to be interchanged for that added versatility.
Hopefully tomorrow I'll follow with a few weathering tips! In time, I'll start doing more step-by-steps with pictures for each stage as I buy and build new units, but at the moment this is all the existing stuff in the army.

 This is a good set of shots showing the Earthshaker Cannon as a whole. The carriage is removable from the main gun, the gun traverses and the support legs at the back can be locked together with a pin to display it in 'limber' mode.


Comments
Post a Comment